Cân bằng tải MikroTik PCC qua các liên kết WAN kép không bằng nhau
Xin chào, bạn ở đây có nghĩa là bạn đang tìm giải pháp Cân bằng tải và Dự phòng liên kết với các liên kết WAN không bằng nhau trong Bộ định tuyến MikroTik của mình. Nếu vậy, đó là nơi đúng của bạn. Trong bài viết trước của tôi, tôi đã thảo luận về cách định cấu hình mạng Cân bằng tải WAN kép và Dự phòng liên kết bằng phương pháp PCC nhưng người ta cho rằng cả hai liên kết WAN đều có băng thông bằng nhau. Nhưng trong tình huống thực tế, bạn có thể có các liên kết WAN không bằng nhau , chẳng hạn như ISP1 có thể có băng thông 10 MB và ISP2 có thể có băng thông 20 MB. Trong trường hợp này, cấu hình Cân bằng tải PCC và Dự phòng liên kết sẽ khác một chút. Vì vậy, trong bài viết này, tôi sẽ trình bày cách định cấu hình mạng Cân bằng tải và Dự phòng liên kết bằng phương pháp PCC sẽ có các kết nối Dual WAN không bằng nhau.
Thiết bị lõi và thông tin IP
Để định cấu hình cân bằng tải với mạng chuyển đổi dự phòng, tôi đang sử dụng MikroTik RouterOS v6.38.1 có hai kết nối ISP và mạng LAN. Thông tin IP mà tôi đang sử dụng cho cấu hình mạng này được cung cấp bên dưới.
- ISP1 IP 192.168.30.2/30 and Gateway IP 192.168.30.1
- ISP2 IP 192.168.60.2/30 and Gateway IP 192.168.60.1
- LAN network: 10.10.70.0/24 and LAN Gateway IP 10.10.70.1/24
- DNS IP: 8.8.8.8 and 8.8.4.4
Thông tin IP này chỉ dành cho mục đích RND của tôi. Thay đổi thông tin này theo yêu cầu mạng của bạn.
Giản đồ hệ thống
Để định cấu hình mạng Cân bằng tải và Dự phòng liên kết với MikroTik RouterOS, tôi đang làm theo sơ đồ mạng như hình bên dưới.
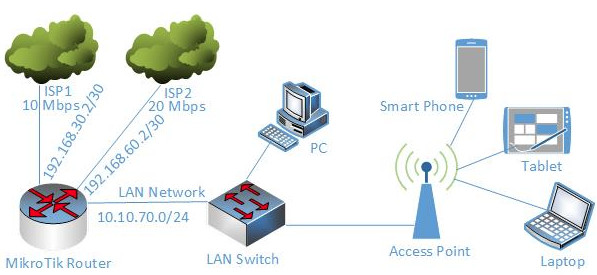
Trong mạng này, Giao diện thứ nhất của Bộ định tuyến MikroTik (ether1) được kết nối với ISP1 có Địa chỉ IP 192.168.30.2/30 và băng thông 10 Mbps và Giao diện thứ 2 (ether2) được kết nối với ISP2 có Địa chỉ IP 192.168.60.2/30 và băng thông 20 Mbps . Trong mạng thực, các Địa chỉ IP này sẽ thay thế bằng Địa chỉ IP công cộng do ISP cung cấp của bạn. Một lần nữa, Giao diện thứ 3 (ether3) được kết nối với mạng LAN có mạng IP 10.10.70.0/24.
Chúng tôi sẽ định cấu hình Cân bằng tải WAN kép và Dự phòng liên kết trong Bộ định tuyến MikroTik này bằng phương pháp PCC và sau khi cấu hình PCC, MikroTik sẽ truyền một phần ba lưu lượng LAN thông qua kết nối ISP1 và hai lưu lượng LAN thứ ba thông qua kết nối ISP2 và nếu bất kỳ ISP nào bị ngắt kết nối, ISP khác sẽ được được sử dụng để vượt qua tất cả lưu lượng mạng LAN cho đến khi ISP bị ngắt kết nối hoạt động. Nếu ISP bị ngắt kết nối trở nên hoạt động, cả hai ISP sẽ được sử dụng để tự động truyền lại lưu lượng LAN.
Cân bằng tải MikroTik với cấu hình chuyển đổi dự phòng qua các liên kết WAN không bằng nhau
Bây giờ, chúng tôi sẽ định cấu hình Cân bằng tải PCC với chuyển đổi dự phòng theo sơ đồ mạng ở trên của chúng tôi. Toàn bộ cấu hình có thể được chia thành bốn phần sau đây.
- Cấu hình cơ bản của MikroTik Router
- Tạo quy tắc Mangle
- Cấu hình định tuyến dựa trên chính sách
- cấu hình NAT
Phần 1: Cấu hình cơ bản của MikroTik Router
Trong phần cơ bản, chúng tôi sẽ chỉ định địa chỉ IP WAN thứ nhất được cung cấp từ ISP1, địa chỉ IP WAN thứ 2 được cung cấp từ ISP2, cổng LAN và DNS. Các bước sau đây sẽ chỉ ra cách thực hiện các bước này trong Bộ định tuyến MikroTik.
- Login to MikroTik Router with winbox by admin privilege credential.
- Click on Interfaces menu item. Interface List window will appear.
- Double click on ether1 interface and rename it as ISP1 and then click Apply and OK button. Similarly, click on ether2 interface and rename it as ISP2 and then click Apply and OK button. Again, click on ether3 interface and rename it as LAN and then click Apply and OK button.
- Go to IP > Addresses menu item and click on PLUS SIGN (+). In New Address window, put ISP1 IP address (192.168.30.2/30) in Address input field and choose ISP1 from Interface dropdown menu and then click on Apply and OK button.
- Similarly, click on PLUS SIGN (+). In New Address window, put ISP2 IP address (192.168.60.2/30) in Address input field and choose ISP2 from Interface dropdown menu and then click on Apply and OK button.
- Again, click on PLUS SIGN (+). In New Address window, put LAN Gateway IP address (10.10.70.1/24) in Address input field and choose LAN from Interface dropdown menu and then click on Apply and OK button.
- Go to IP > DNS menu item and put DNS IP (8.8.8.8) in Servers input field and click Apply and OK button.
Ngoài ra, bạn có thể chạy lệnh bên dưới từ MikroTik CLI.
/interfaceset “ether1″ name=”ISP1”
set “ether2″ name=”ISP2”
set “ether3″ name=”LAN”
/ ip address
add address=192.168.30.2/30 interface=ISP1
add address=192.168.60.2/30 interface=ISP2
add address=10.10.70.1/24 interface=LAN
Cấu hình cơ bản MikroTik Router đã hoàn tất. Bây giờ chúng ta sẽ tạo Mangle rule để đánh dấu kết nối và định tuyến.
Phần 2: Tạo Mangle Rule
Quy tắc mangle được sử dụng để đánh dấu gói để định tuyến thích hợp. Trong phần này, chúng tôi sẽ tạo các quy tắc mangle khác nhau sẽ giúp đánh dấu kết nối và định tuyến cũng như chuyển các lưu lượng mạng khác nhau đến các kết nối WAN khác nhau. Chuyển đến mục menu IP > Tường lửa và nhấp vào tab Mangle và tạo 10 quy tắc sau như được chỉ ra.
- Click on PLUS SIGN (+). New Mangle Rule window will appear. Click on General tab and choose prerouting from Chain dropdown menu and put ISP1 network address (192.168.30.0/30) in Dst. Address input and then choose LAN from In. Interface dropdown menu. Now click on Action tab and choose accept from Action dropdown menu and then click on Apply and OK button.
- Click on PLUS SIGN (+). New Mangle Rule window will appear. Click on General tab and choose prerouting from Chain dropdown menu and put ISP2 network address (192.168.60.0/30) in Dst. Address input and then choose LAN from In. Interface dropdown menu. Now click on Action tab and choose accept from Action dropdown menu and then click on Apply and OK button.
- Click on PLUS SIGN (+). New Mangle Rule window will appear. Click on General tab and choose prerouting from Chain dropdown menu and choose ISP1 from In. Interface dropdown menu and then choose no-mark from Connection Mark dropdown menu. Now click on Action tab and choose mark connection from Action dropdown menu and put a connection mark name (ISP1_conn) in New Connection Mark input field. Uncheck Passthrough checkbox if it is checked. Click on Apply and OK button.
- Click on PLUS SIGN (+). New Mangle Rule window will appear. Click on General tab and choose prerouting from Chain dropdown menu and choose ISP2 from In. Interface dropdown menu and then choose no-mark from Connection Mark dropdown menu. Now click on Action tab and choose mark connection from Action dropdown menu and put a connection mark name (ISP2_conn) in New Connection Mark input field. Uncheck Passthrough checkbox if it is checked. Click on Apply and OK button.
- Click on PLUS SIGN (+). New Mangle Rule window will appear. Click on General tab and choose prerouting from Chain dropdown menu and choose LAN from In. Interface dropdown menu and then choose no-mark from Connection Mark dropdown menu. Click on Advanced tab and choose both addresses from Per Connection Classifier dropdown menu and put 2 in next 1st input field and 0 in 2nd input field. Click on Extra tab and click on Dst. Address Type option and choose local from Address Type dropdown menu and then click on Invert checkbox. Click on Action tab and choose mark connection from Action dropdown menu and put a connection mark name (ISP1_conn) in New Connection Mark input field. Uncheck Passthrough checkbox if it is checked. Click on Apply and OK button.
- Click on PLUS SIGN (+). New Mangle Rule window will appear. Click on General tab and choose prerouting from Chain dropdown menu and choose LAN from In. Interface dropdown menu and then choose no-mark from Connection Mark dropdown menu. Click on Advanced tab and choose both addresses from Per Connection Classifier dropdown menu and put 2 in next 1st input field and 1 in 2nd input field. Click on Extra tab and click on Dst. Address Type option and choose local from Address Type dropdown menu and then click on Invert checkbox. Click on Action tab and choose mark connection from Action dropdown menu and put a connection mark name (ISP2_conn) in New Connection Mark input field. Uncheck Passthrough checkbox if it is checked. Click on Apply and OK button.
- Click on PLUS SIGN (+). New Mangle Rule window will appear. Click on General tab and choose prerouting from Chain dropdown menu and choose LAN from In. Interface dropdown menu and then choose no-mark from Connection Mark dropdown menu. Click on Advanced tab and choose both addresses from Per Connection Classifier dropdown menu and put 2 in next 1st input field and 2 in 2nd input field. Click on Extra tab and click on Dst. Address Type option and choose local from Address Type dropdown menu and then click on Invert checkbox. Click on Action tab and choose mark connection from Action dropdown menu and put a connection mark name (ISP2_conn) in New Connection Mark input field. Uncheck Passthrough checkbox if it is checked. Click on Apply and OK button.
- Click on PLUS SIGN (+). New Mangle Rule window will appear. Click on General tab and choose prerouting from Chain dropdown menu and choose LAN from In. Interface dropdown menu and then choose ISP1_conn from Connection Mark dropdown menu. Now click on Action tab and choose mark routing from Action dropdown menu and put a routing mark name (to_ISP1) in New Routing Mark input field. Uncheck Passthrough checkbox if it is checked. Click on Apply and OK button.
- Click on PLUS SIGN (+). New Mangle Rule window will appear. Click on General tab and choose prerouting from Chain dropdown menu and choose LAN from In. Interface dropdown menu and then choose ISP2_conn from Connection Mark dropdown menu. Now click on Action tab and choose mark routing from Action dropdown menu and put a routing mark name (to_ISP2) in New Routing Mark input field. Uncheck Passthrough checkbox if it is checked. Click on Apply and OK button.
- Click on PLUS SIGN (+). New Mangle Rule window will appear. Click on General tab and choose output from Chain dropdown menu and then choose ISP1_conn from Connection Mark dropdown menu. Now click on Action tab and choose mark routing from Action dropdown menu and put a routing mark name (to_ISP1) in New Routing Mark input field. Uncheck Passthrough checkbox if it is checked. Click on Apply and OK button.
- Click on PLUS SIGN (+). New Mangle Rule window will appear. Click on General tab and choose output from Chain dropdown menu and then choose ISP2_conn from Connection Mark dropdown menu. Now click on Action tab and choose mark routing from Action dropdown menu and put a routing mark name (to_ISP2) in New Routing Mark input field. Uncheck Passthrough checkbox if it is checked. Click on Apply and OK button.
Ngoài ra, bạn có thể chạy lệnh bên dưới từ MikroTik CLI.
/ ip firewall mangleadd chain=prerouting dst-address=192.168.30.0/30 action=accept in-interface=LAN
add chain=prerouting dst-address=192.168.60.0/30 action=accept in-interface=LAN
add chain=prerouting in-interface=ISP1 connection-mark=no-mark action=mark-connection \
new-connection-mark=ISP1_conn
add chain=prerouting in-interface=ISP2 connection-mark=no-mark action=mark-connection \
new-connection-mark=ISP2_conn
add chain=prerouting in-interface=LAN connection-mark=no-mark dst-address-type=!local \
per-connection-classifier=both-addresses:2/0 action=mark-connection new-connection-mark=ISP1_conn
add chain=prerouting in-interface=LAN connection-mark=no-mark dst-address-type=!local \
per-connection-classifier=both-addresses:2/1 action=mark-connection new-connection-mark=ISP2_conn
add chain=prerouting in-interface=LAN connection-mark=no-mark dst-address-type=!local \
per-connection-classifier=both-addresses:2/2 action=mark-connection new-connection-mark=ISP2_conn
add chain=prerouting connection-mark=ISP1_conn in-interface=LAN action=mark-routing \
new-routing-mark=to_ISP1
add chain=prerouting connection-mark=ISP2_conn in-interface=LAN action=mark-routing \
new-routing-mark=to_ISP2
add chain=output connection-mark=ISP1_conn action=mark-routing new-routing-mark=to_ISP1
add chain=output connection-mark=ISP2_conn action=mark-routing new-routing-mark=to_ISP2
Quy tắc mangle để khớp và đánh dấu các gói đã được tạo thành công. Bây giờ chúng tôi sẽ định cấu hình định tuyến dựa trên chính sách để gói được đánh dấu có thể được định tuyến đúng cách thông qua kết nối ISP thích hợp.
Phần 3: Cấu hình định tuyến dựa trên chính sách
Các quy tắc mangle mà chúng tôi đã tạo sẽ đánh dấu kết nối nhưng không thực hiện bất kỳ điều gì trong việc định tuyến. Để chuyển kết nối được đánh dấu sang kết nối ISP thích hợp, chúng ta cần định cấu hình định tuyến dựa trên chính sách. Các bước sau đây sẽ chỉ ra cách định cấu hình định tuyến dựa trên chính sách cho kết nối được đánh dấu.
- Go to IP > Routes menu item. Route List window will appear.
- Click on PLUS SIGN (+). New Route window will appear. Put ISP1 gateway address (192.168.30.1) in Gateway input field. Choose ping from Check Gateway dropdown menu. Choose ISP1 routing mark (to_ISP1) from Routing Mark dropdown menu. Click Apply and OK button.
- Click on PLUS SIGN (+). New Route window will appear. Put ISP2 gateway address (192.168.60.1) in Gateway input field. Choose ping from Check Gateway dropdown menu. Choose ISP2 routing mark (to_ISP2) from Routing Mark dropdown menu. Click Apply and OK button.
- Click on PLUS SIGN (+). New Route window will appear. Put ISP1 gateway address (192.168.30.1) in Gateway input field. Choose ping from Check Gateway dropdown menu. Put 1 in Distance input field and Click Apply and OK button.
- Click on PLUS SIGN (+). New Route window will appear. Put ISP2 gateway address (192.168.60.1) in Gateway input field. Choose ping from Check Gateway dropdown menu. Put 2 in Distance input field and Click Apply and OK button.
Ngoài ra, bạn có thể chạy lệnh bên dưới từ MikroTik CLI.
/ ip routeadd dst-address=0.0.0.0/0 gateway=192.168.30.1 routing-mark=to_ISP1 check-gateway=ping
add dst-address=0.0.0.0/0 gateway=192.168.60.1 routing-mark=to_ISP2 check-gateway=ping
add dst-address=0.0.0.0/0 gateway=192.168.30.1 distance=1 check-gateway=ping
add dst-address=0.0.0.0/0 gateway=192.168.60.1 distance=2 check-gateway=ping
Cấu hình định tuyến để chọn ISP phù hợp đã hoàn tất. Bây giờ chúng ta cần định cấu hình NATing để lưu lượng mạng LAN có thể truy cập internet.
Phần 4: Cấu hình NAT
Trong phần cuối, chúng ta sẽ cấu hình NATing. Nếu không, người dùng mạng LAN không thể truy cập internet thông qua Bộ định tuyến MikroTik. Các bước sau đây sẽ hướng dẫn cách cấu hình NAT trong MikroTik Router cho một kết nối ISP cụ thể.
- Go to IP > Firewall menu item and click on NAT tab.
- Click on PLUS SIGN (+). New NAT Rule window will appear. In General tab, choose srcnat from Chain dropdown menu and choose ISP1 from Out. Interface dropdown menu. Click on Action tab and choose masquerade from Action dropdown menu and click Apply and OK button.
- Similarly, click on PLUS SIGN (+) again. New NAT Rule window will appear. In General tab, choose srcnat from Chain dropdown menu and choose ISP2 from Out. Interface dropdown menu. Click on Action tab and choose masquerade from Action dropdown menu and click Apply and OK button.
Ngoài ra, bạn có thể chạy lệnh bên dưới từ MikroTik CLI.
/ ip firewall natadd chain=srcnat out-interface=ISP1 action=masquerade
add chain=srcnat out-interface=ISP2 action=masquerade
Cấu hình NAT cũng như tất cả các cấu hình của chúng tôi cho Cân bằng tải PCC và Dự phòng liên kết đã được hoàn tất. Giờ đây, người dùng mạng LAN sẽ nhận được kết nối internet không bị gián đoạn cho đến khi cả hai kết nối ISP bị mất.
MikroTik Cân bằng tải WAN kép không bằng nhau và Dự phòng liên kết bằng PCC đã được thảo luận trong bài viết này ngay từ đầu. Tôi hy vọng bây giờ bạn sẽ có thể định cấu hình mạng Cân bằng tải và Dự phòng liên kết đáng tin cậy 100% với Bộ định tuyến MikroTik của mình bằng phương pháp PCC. Tuy nhiên, nếu bạn gặp phải bất kỳ sự nhầm lẫn nào khi áp dụng phương pháp PCC, vui lòng thảo luận trong nhận xét hoặc liên hệ với tôi từ trang Liên hệ .