Cấu hình máy chủ DHCP MikroTik trong RouterOS v7
Dynamic Host Configuration Protocol (DHCP) is a client/server protocol where a DHCP server automatically provides an Internet Protocol (IP) address and other related information such as subnet mask, default gateway and DNS to DHCP clients. DHCP server and client use UDP port 67 and 68 for communication.
In a network, a DHCP client (IP devices such as Desktop, Laptop, Smartphone etc.) requests for an IP lease sending broadcast message over 67/UDP port to any DHCP server and a DHCP server responses over 68/UDP allocating IP address and other related IP information for a certain period. So, a DHCP server reduces huge network administration tasks of a system administrator.
Every MikroTik RouterOS including RouterOS v7 has a built-in DHCP service. So, system admin can easily turn MikroTik RouterOS into a DHCP server and can easily reduce his network administration task.
In my previous article, I discussed elaborately how to configure a MikroTik RouterOS v7 first time and in this article I am going to show how to configure a DHCP Server in MikroTik RouterOS v7.
MikroTik DHCP Server Setup in RouterOS 7
DHCP Service is built-in in MikroTik RouterOS v7 but not enabled by default. So, if we want to use DHCP Server in our network with MikroTik RouterOS v7, we have to setup and configure it.
But before going to start DHCP Server configuration in MikroTik RouterOS v7, I will show a basic network diagram as an example where a MikroTik Router is working as a DHCP Server as well as it is working as a network gateway. I hope, your network will be almost similar like the following network diagram and you will be able to run a smooth DHCP Server in your network with MikroTik RouterOS v7.
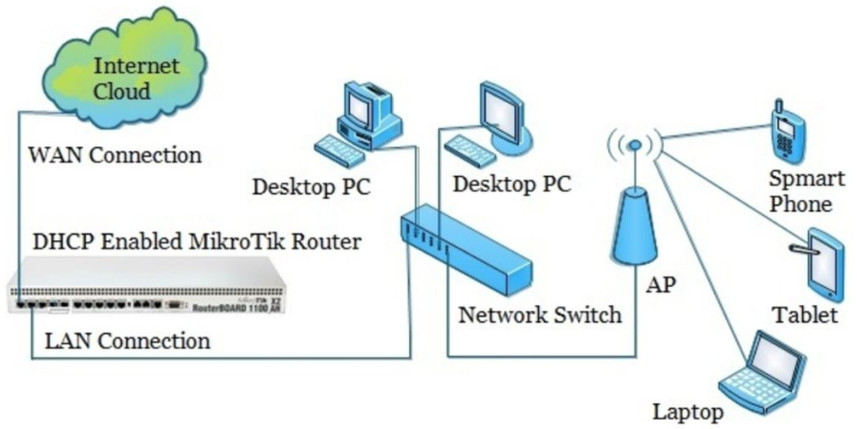
Trong sơ đồ mạng trên, giao diện ether1 của MikroTik Router được kết nối với ISP để truy cập internet và giao diện này được gọi là WAN. Tất cả người dùng mạng LAN được kết nối với giao diện ether2 thông qua một bộ chuyển đổi mạng.
Bây giờ chúng ta sẽ kích hoạt Máy chủ DHCP trên giao diện ether2 để tất cả người dùng mạng LAN sẽ tự động nhận thông tin mạng (IP, Mặt nạ mạng con, Cổng và DNS) từ Máy chủ DHCP này. Nhưng trước khi kích hoạt máy chủ DHCP trong MikroTik RouterOS 7, chúng ta phải hoàn thành cấu hình cơ bản của MikroTik RouterOS. Cấu hình cơ bản của MikroTik RouterOS 7 bằng Winbox hoặc lệnh đã được thảo luận trong bài viết trước. Vì vậy, hãy làm theo bài viết đó để biết cấu hình cơ bản của RouterOS 7 và sau đó làm theo các bước sau để cấu hình DHCP Server bằng Winbox.
- Go to IP > DHCP Server menu item from Winbox. DHCP Server window will appear.
- In DHCP Server window, click on DHCP Setup button and choose the interface (in this article: ether2) on which you want to setup DHCP server from DHCP Server Interface drop-down menu and then click on Next button.
- Now put your LAN network block in DHCP Address Space input box and click Next button. DHCP client/LAN user will get IP from this network.
- Choose gateway address for the given network in Gateway for DHCP Network input box and then click Next button.
- Provide IP range from which DHCP client/LAN user will get IP in Address to Give Out input box and click Next button.
- Provide preferred DNS server IP and click Next button.
- Provide IP lease time and click Next button. Default lease time is 3 days.
- DHCP setup is now complete and a successful message will be shown.
Bây giờ hãy kết nối bất kỳ thiết bị IP nào (Máy tính để bàn, Máy tính xách tay, Điện thoại thông minh, v.v.) với mạng của bạn. Một IP sẽ tự động được cấp phát cho thiết bị đó từ MikroTik DHCP Server. Nhấp vào tab Cho thuê và quan sát trạng thái thuê IP của máy khách DHCP đó.
Cấu hình DHCP Server trong MikroTik RouterOS7 đã được giải thích từng bước trong bài viết này. Tôi hy vọng, bạn sẽ có thể định cấu hình Máy chủ DHCP trong mạng của mình với MikroTik Router OS v7. Tuy nhiên, nếu bạn gặp phải bất kỳ sự nhầm lẫn nào khi định cấu hình máy chủ DHCP trong MikroTik Router OS7, vui lòng thảo luận trong nhận xét hoặc liên hệ với tôi từ trang Liên hệ .